In this article, we’re going to show you how to use a light meter and why it will help you create better-looking videos. Also, we’ll cover the basics of exposure and light so you’ll never look at a scene in the same way again!
Have you ever seen someone with a light meter and wondered, “What year is this person from? Who uses film these days anyway?”
Well, you’ll be surprised to hear that the light meter is the best tool for precise exposure, even in the digital age. With its accurate values, you can make the best decision for any shooting situation.
Knowing how to use one gives you a deeper understanding of light and, in turn, makes you a better filmmaker. 👍
To get started, let’s cover a few of the basics when it comes to light.
What is a Light Meter?
A light meter is a tool that measures light in any given situation to determine proper exposure. As a result, you can then calibrate your camera’s exposure accurately to middle grey (18% reflectance) or 40 IRE.
There are three main types of light metering: Incident, Reflective, & Spot.
How Does a Light Meter Work?
Exposure consists of three factors: aperture, shutter speed, and ISO. One will always affect the other. You can prioritize one on your meter, and the others will compensate for the exposure.
The job of the light meter is to bring whatever it’s seeing to the middle gray.
What is Middle Gray?
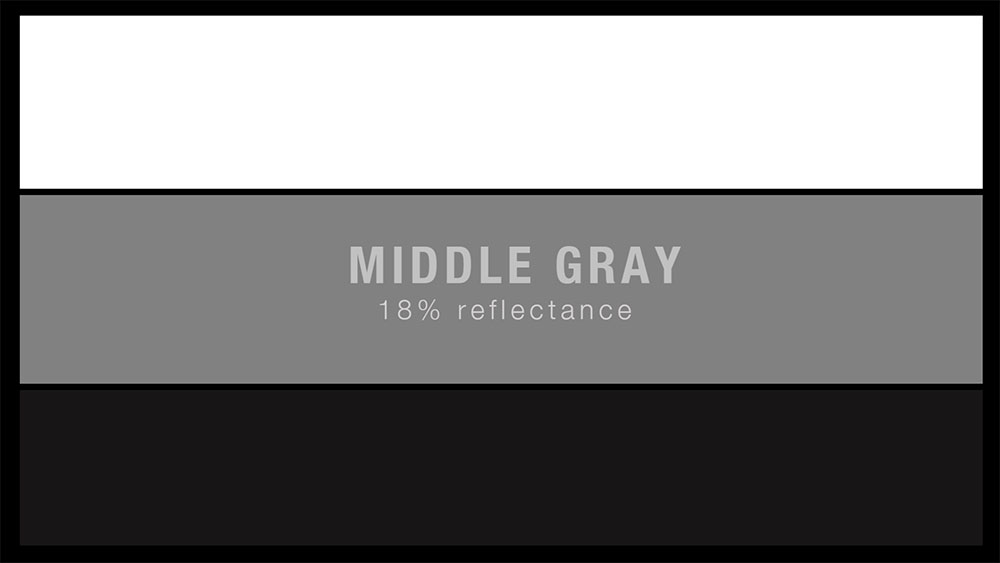
First of all, middle grey is a measurement on the lightness scale, halfway between black and white. It is technically defined as 18% visible light.
It can also be referred to as a color, such as middle blue or middle red. The color isn’t important; it’s the tone that meters are programmed to understand.
For example, if you point your light meter at a bright cloud, the exposure meter will give you an exposure value to make that bright white cloud look middle grey. For easy calibration on set, get yourself a handy Color Checker.
What is a Lumisphere?
The white dome on the end of the light meter is called the lumisphere. This measures light coming in directly or reflected off a subject from a light source. Depending on its position, it averages out the highlights as well as the shadows.
A Retracted Lumisphere reads individual light sources, and an Exposed Lumisphere reads the overall ambient reading
What is a Light Ratio?
First, light ratios help you achieve the look and feel of your project. Secondly, they help track exact light measurements so you can repeat your looks when shooting over a period of time and in different locations or with separate crews.
If you light a subject equally on both sides, it will look flat. But if you set up a key light on one side and your fill light (2 stops under) on the other, you will have a 4:1 lighting ratio.
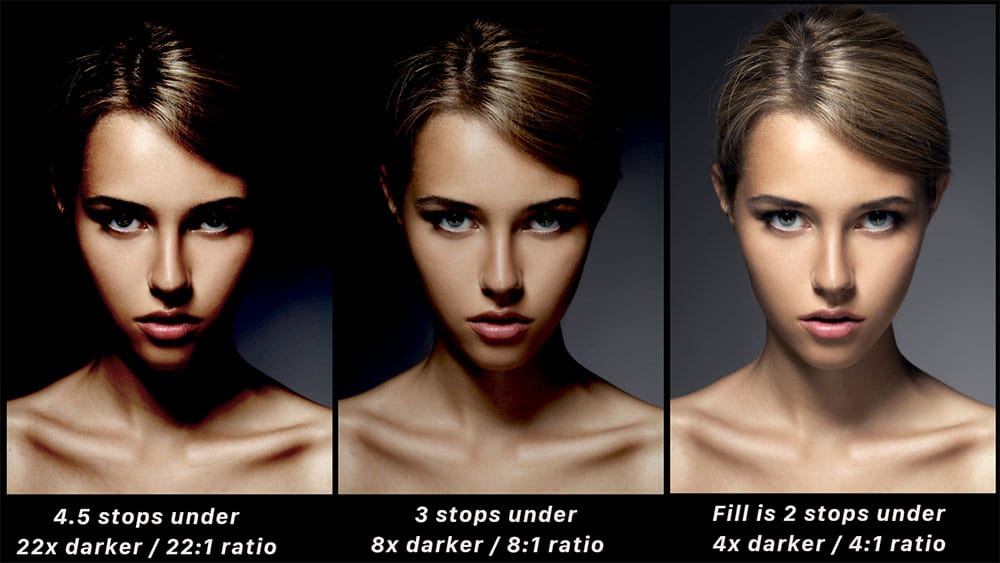
Light Ratio Math
The brightness of a light is expressed in factors of 2. If you increase (1) f-stop of light, you double (2x) the amount of light. Conversely, if you lower (1) f-stop, this cuts the amount of light in half.
| f-Stop | Light Source | Light Ratio |
|---|---|---|
| 1 f-stop | 2x brighter | 2:1 |
| 2 f-stops | 4x brighter | 4:1 |
| 3 f-stops | 8x brighter | 8:1 |
| 4 f-stops | 16x brighter | 16:1 |
In the end, light meters really help you find and repeat a lighting ratio that suits the needs of your project. Here’s a quick video to explain the concept further.
Types of Light Metering
As mentioned there are 2 main types of light metering. Here is a quick breakdown of each one including a short step-by-step guide to help understand how light metering works.
Reflective Metering
First, Reflective Metering reads light that bounces off the subject from its source and into the meter. The light meter determines how much light is reflecting off the subject, and then the exposure is calculated for middle gray.
- Make a creative decision for the desired look
- Set the priority values into the meter (ISO, Aperture, Shutter )
- Aim the meter towards the subject from the camera’s POV (point of view)
- Take the meter reading
- Adjust the lighting or compensate for exposure by adjusting the ISO, Aperture, or Shutter speed. You could also add ND filters to reduce light or use a speed booster to add light.
This method of metering is usually performed when you can’t approach the subject.

Spot Metering
In addition to this, there is a more specific form of reflective metering called Spot Metering. Meters that have this feature allow you to look through the viewfinder and focus on a small area of the scene.
It’s important to realize that a camera light meter will decide on an exposure reading from multiple zones of 1 frame. Whereas with spot metering, the measurement is taken from a single spot.
- Make a creative decision for the desired look
- Position the light meter near the camera lens
- Aim the meter to the exact spot you want to read from the camera’s POV
- Take the meter reading
- Adjust the lighting or compensate for exposure by adjusting the ISO, Aperture, or Shutter speed.
This is useful in high-contrast lighting situations or when the subject is backlit. You can also measure shadows and highlight differences to reach a fitting aperture. This way, you can control how much you over or under expose your background or foreground.
Incident Light Metering
Finally, there is Incident Light Metering. An incident meter works by reading the intensity of the light that falls onto the subject, as opposed to reading the light reflected off of the subject.
- Make a creative decision for the desired look
- Position the light meter from the POV of the subject
- Angle the lumisphere (white dome) towards the light source
- Take the meter reading
- Adjust your camera settings for middle grey

Why use a Light Meter?
There are many advantages to using a light meter but here are our 4 main reasons you should take one on your next shoot.
Consistent Light Ratios
If you notice, quality films or interviews tend to have a similar look throughout the project.
An even style can be achieved through light ratios, such as 1:1, 4:1, 8:1, and so on. By using exact measurements, the look and feel you’re going for can be repeated throughout the project.
Location Scouting
Imagine this, you’re scouting a location with a client in a kitchen without a camera. Then, they say “What are we going to need to shoot this scene?” and you respond with “Umm, I need to think about it”.
More often than not, their confidence in your abilities will go down.
However, with the precision of a light meter, you’ll be able to see without a lens. This way, you can estimate the equipment needed to achieve any look desired right there on the spot.
Repeatable Results
Let’s say you are shooting several interviews in different locations spread out over a few weeks. Without light measurements, getting the exact look will be very difficult. You could try eying it out, but you’ll never be as precise as you could be with measurements from a light meter.
Also, it will help stop having to fix the differences in post-production.
Exposure Accuracy
When working with a team, different camera light meters will give you different exposure readings. But with a light meter, you can discover the unknowns before you start rolling. 😉
Wrapping Up
In short, learning how light allows you to be measured, controlled and will definitely pay off in your work.
Changing the aperture, ISO, and shutter can be difficult choices to make on the fly, but a decent light meter will tell you exactly what your settings need to be. You can forget the guesswork when working with exact lighting values.
Once you give light meters a go and understand their basic functions then you’ll gain confidence in your decisions and take your filmmaking to the next level!