Welcome back to the final tutorial in our series! Previously, we showed you how to import, edit, add transitions, and color grade in Premiere Pro.
Now that your film is trimmed, polished, and ready to go, it’s time to learn how to export it.
Before You Start
There are many export options, and it can feel a bit overwhelming at first.
So, let’s break it down into a few simple steps. Before you begin, think about where your finished film will be shown.
If it’s going on social media sites such as Facebook, LinkedIn, Instagram, or Twitter, you’ll want to adjust the compression settings for those platforms.
It might seem counterintuitive to export your videos at a lower quality, but if you upload a large, high-definition file, most sites will automatically compress it anyway.
Open the Export Window
First, to open the export settings window, make sure your timeline panel is selected (it will have a blue outline around it).

Next, go to File > Export > Media. This will open the export settings window.
Alternatively, with the timeline panel selected, press CTRL + M (or CMD + M on a Mac).
On the left side of the window, you’ll see the source preview, showing what your film will look like. You don’t need to change anything there.
All your export settings are on the right-hand side.
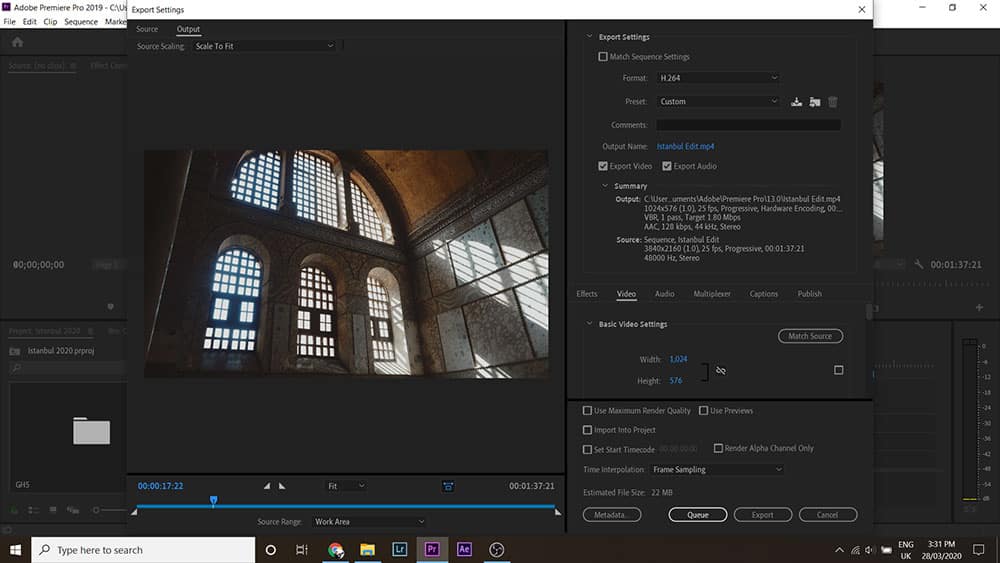
First, make sure the format is set to H.264. This format uses an efficient codec that delivers high-quality videos while using minimal bandwidth.

Choose a Preset
Below that, you’ll find a drop-down menu for presets. As you’ll see, there are plenty of options to choose from.
For example, if you’re uploading your film to YouTube, there’s a preset for YouTube 1080p Full HD. There are also presets for Facebook and Twitter.
That’s pretty much all you need to do. By choosing a preset, Premiere Pro does most of the work for you!
Alternatively, if your film will be shown at a festival on a big screen and was shot in 4K, select a preset such as High Quality 1080p HD or High Quality 2160p 4K.
Common Delivery Formats
Below, we’ve put together a table of the most common delivery formats and their recommended export settings.
| Platform | Premiere Pro Preset | Frame Size | Bitrate | Format | Audio Codec | Audio Bitrate |
| YouTube | YouTube 1080p Full HD | 1920×1080 | 16 Mbps | H.264 | AAC | 320 kbps |
| Vimeo | Vimeo 1080p Full HD | 1920×1080 | 16 Mbps | H.264 | AAC | 320 kbps |
| Facebook 1080p Full HD | 1920×1080 | 12 Mbps | H.264 | AAC | 192 kbps | |
| Facebook 1080p Full HD | 1920×1080 | 12 Mbps | H.264 | AAC | 192 kbps | |
| Instagram Feed | Mobile Device 1080p HD | 1920×1080 | 8 Mbps | H.264 | AAC | 128 kbps |
| Instagram Stories | Mobile Device 1080p HD | 1080×1920 | 8 Mbps | H.264 | AAC | 128 kbps |
| Twitter 1080p Full HD | 1920×1080 | 2.05 Mbps | H.264 | AAC | 128 kbps | |
| Wistia | YouTube 1080p Full HD | 1920×1080 | 16 Mbps | H.264 | AAC | 320 kbps |
| Large Screen (HD) | High Quality 1080p HD | 1920×1080 | 20 Mbps | H.264 | AAC | 320 kbps |
| Large Screen (4K) | High Quality 2160p 4K | 3840×2160 | 80 Mbps | H.264 | AAC | 320 kbps |
Each time you adjust the quality with a preset, you’ll notice that the estimated file size at the bottom of the export window changes.
This is based on the video’s bitrate, which we’ll explain next.
Adjust the Bitrate
Bitrate refers to the number of bits per second. The common unit for video is Mbps (megabits per second), and it determines both the size and quality of the file.
In general, a higher bitrate means better quality but a larger file size.
When you select a preset, Premiere automatically chooses a bitrate, but sometimes you might need to tweak it manually.
To do that, go back to the video tab in the export settings, where you can adjust the resolution’s width and height.

Scroll down to the Bitrate Settings section. Use the slider to adjust the bitrate.
If you want a smaller file size and don’t mind sacrificing some quality, set it between 1–2 Mbps.
However, if you want top-quality output and don’t mind a larger file, increase it to around 20 Mbps.
Double-Check Your Settings
It’s worth experimenting a bit to find the right balance between quality and file size. This can take a little time and practice.
Before hitting export, double-check that all the necessary boxes—like Export Audio—are still selected in the export settings window.
Name Your File
Finally, choose a file name and export location.
To do this, go to Output Name and click the blue, underlined text.
This will open a window where you can select the save location and type your file name. We recommend using a clear, descriptive name relevant to your project.
In this example, we’re exporting a video about Istanbul, so we’ll name it “Istanbul 2020” and save it in the “Edits” folder inside “Istanbul.”
Export Your Video
Now you’re ready to go! Click the Export button and let your computer do the rest. A progress bar will appear in the middle of your screen, showing how long the export will take.
That’s the basics of exporting videos in Premiere Pro. As always, we recommend experimenting with different presets and settings to see what works best for your needs.
And remember—always consider where your video will be shown. That will greatly affect your final file size and quality.