Have you ever seen a shot from a film and instantly felt a sense of happiness, balance, and connection? Well, there’s a name for this style of cinematography: high-key lighting.
In this article, we discuss high-key lighting, why it’s used, where you’ve seen it, and how you can use it in your next project.
The relationship between lighting and story goes hand in hand, so having a better understanding of it will help you make creative decisions. Also, effective cinematography will help your story be felt before it’s understood.
What is High-Key Lighting?
You’ve most likely seen high-key lighting used repeatedly in sitcoms, commercials, comedies, and films. This popular film lighting technique is used on both interior and exterior scenes. It’s also referred to as beauty or wrap-around lighting.
High-key lighting consists of a bright and evenly lit frame with minimal shadows and low contrast ratios. This means fewer dimensions and less definition.
This creates a positive and uplifting atmosphere for a scene. There is nothing to hide; everything is out in the open for the viewer to see.

High-key lighting conveys simplicity, truth, openness, joyfulness, and glamor. It is the opposite of low-key lighting, which produces stark shadows and high contrast, creating dramatic tension and fear.
Additionally, high-key lighting addresses the scene’s main subject and the contrast between the foreground subject and the background.
Short History

High-key lighting was originally popular on the TV show I Love Lucy (1951) by the Academy Award-winning cinematographer Karl Freund. His idea included using multiple cameras to film at once without adjusting lights, saving time and money while filming in front of a live studio audience.
It was a significant risk for his career, but he did so with success. Generations of show creators owe him a great deal of gratitude, as this same technique is used on broadcasts and sitcoms today.
Why Use High-Key Lighting?
There are many reasons to use high-key lighting in film. For example:
- Create a positive atmosphere
- Establish a balanced mood
- Provide insight into a character
- Create a surface-level impression
- To contrast the upcoming drama
- Ideal future world
- Dream sequences
However, it’s helpful to define your intention clearly in pre-production. For example, what emotions are you trying to evoke from a scene? What are you developing within the character? What does look accurately express the essence of the story?
Film Examples
You’ve probably seen examples of high-key lighting repeatedly without realizing it.
This style is often found in comedies, light-hearted films, and commercial projects. It’s also a creative tool, which we’ll explore later.
Even without the context of knowing what’s taking place within each scene, you get an overall sense from each shot.
Below are some classic examples. Note the bright subjects, even backgrounds, lack of shadows, and overall tone.
Asteroid City (2023)

Wes Anderson regularly uses high-key lighting. He’s made it a trademark style that can be seen throughout his films, in addition to his distinctive color palette and production design. Films such as The Grand Budapest Hotel (2014), Moonrise Kingdom (2012), and The Royal Tenenbaums (2001).
Barbie (2023)
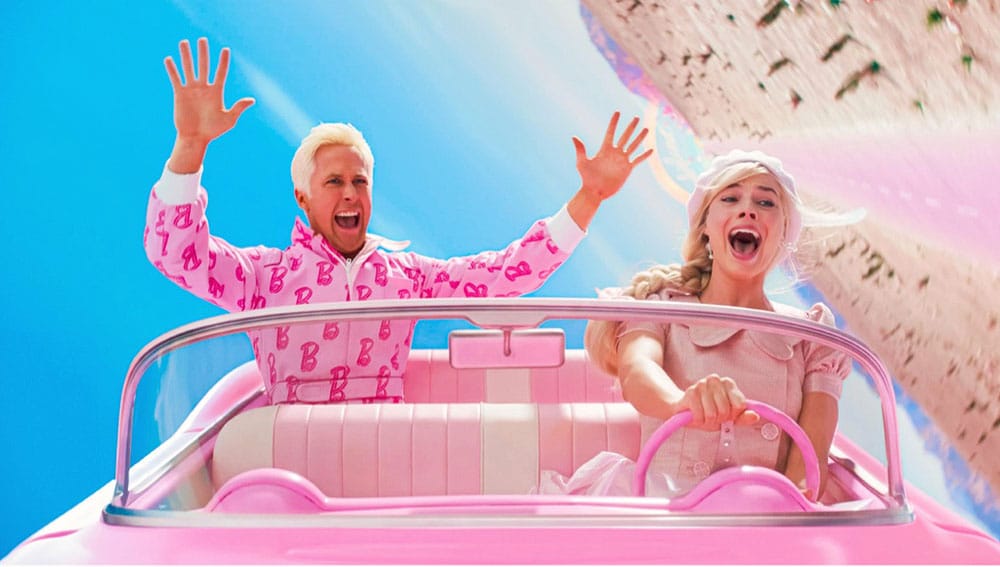
High-key lighting in this film showcases Barbie and Ken’s squeaky-clean existence until they decide to venture into the real world.
Little Miss Sunshine (2006)

This example differs from others because it uses evenly lit frames to portray positivity on a superficial level. However, this creative tactic allows the viewer to discover that this loving family has many flaws below the surface.
Midsommer (2019)

Similarly, the horror film Midsommar broke new ground using high-key lighting. The seducing and blissful setting takes you from a heavenly environment to a disturbing dimension.
They are all great examples of how visuals can help influence the narrative and lead the viewer in a certain way.
How To Use High-Key Lighting
A high-key lighting setup can be very simple or complex, depending on the scenario. As you can probably imagine, you’ll need plenty of light to achieve a soft and brightly lit scene.
Using it requires attention to all the details. Everything needs to be evenly lit to create a balanced look. In contrast, in low-key lighting, certain areas of the frame can go unnoticed because they are hidden by shadow.
To get started, softbox lighting will be your best friend. Also, remember that a smaller light source will create harsh lines, sharper edges, and shadows, whereas a larger light source will create soft and feathered edges.
In short, the bigger the light source, the closer you’ll get to perfect high-key lighting. 👍
Step-by-Step Guide
Follow the four steps below to create a soft and evenly lit shot.
- Start with the fundamental 3-point lighting technique: key, fill, and backlight. Position your key above the eyeline and angle it downward towards your subject.
- Adjust your fill light to nearly a 1:1 ratio. Generally, you’re aiming for one f-stop or less between the key and the fill on your subject. Not sure about light ratios? Check our other article on light meters, where there is an easy-to-understand table on light ratios and f-stops.
- Next, inspect all the details of the frame. Your goal is to identify and brighten any dark areas or shadows. You might need several fill lights and reflectors to achieve a balanced look.
- Now, it’s time to light up the background. Generally, the lighting ratio between the main subject and background is 1.5 stops or less. Big muslins or silk diffusers placed in front of your fill lights distribute even light well.
- Lastly, always be sure to test your setup. It’s essential to see the camera and character movement within the scene. These adjustments can introduce unexpected shadows or loss of intended exposure on your subject.
Pro Tip: Use your camera or monitor’s false color feature whenever possible. This feature allows you to see the actual evenness of your lighting.
For more tips, check out this quick tutorial video about high-key lighting on a budget.
Essential Equipment
As mentioned, you’ll need some serious firepower to achieve high-key lighting. This would ideally include the following kit:
- 3 x high power lights (minimum combined power of 200W)
- Honeycomb grids to help direct light and prevent spilling into unwanted areas
- Softboxes or large diffusion sheets (muslin or silk)
- Reflector discs or bounce boards (4×4 or 8×8)
- C-Stands, sandbags, boom arm, Cardellini clamps, and sandbags
However, by all means, don’t allow limited equipment to get you down. Always work with what you have. Again, natural light and reflectors can be extremely useful when on a tight budget.
Budget Options
Along those lines, there are some simple, budget-friendly ways to illuminate your scene. First, try bouncing a key light off a white ceiling. This gives you a similar effect to a large softbox from above your subject.
Secondly, place the reflector underneath your subject to fill the subject’s eyes. Another useful tool is a ring light. These are great for zero-contrast lighting. Lastly, use natural light whenever possible. Cloudy days are the cheapest natural diffusion.
Wrapping Up
To sum up, the way a scene appears is the way a viewer experiences the story.
Remember to ask yourself simple questions, such as: What’s the goal of your scene? How does the tone reflect the character? How does the mood fit into the bigger picture? The answers to these questions should clarify how to light each shot.
Now, get out there and experiment with various lighting setups. This way, you’ll be able to confidently create the look and feel for your next project.